⏱️ Total Setup Time: ~2-3 hours
TL;DR
I built a free Purple Team lab at home using Ludus and Proxmox on an Intel NUC. This lab includes Linux and Windows targets with Splunk logging. The whole setup runs locally without cloud costs. In this post, I’ll break down the architecture, setup steps, and some practical tips to help you get started.
Introduction: The Quest for an Affordable Purple Team Lab
Building effective cybersecurity detection capabilities requires hands-on experience with real attack scenarios. If you’re a security professional looking to enhance your purple team skills, you’ve probably considered Splunk Attack Range and if you’ve tried the cloud version, you know it can get expensive fast.
After getting hit with a £50 AWS bill after just one day of testing, I knew there had to be a better option. That’s when I discovered a simpler, more sustainable approach: running Splunk Attack Range locally using Ludus on Proxmox. It gives you everything you need to build and test purple team scenarios, without the cloud costs creeping up behind you. In this post, I’ll walk through how I setup Splunk Attack Range on my own Proxmox and how it helped me bring my purple team goals to life.
Lab Architecture Overview
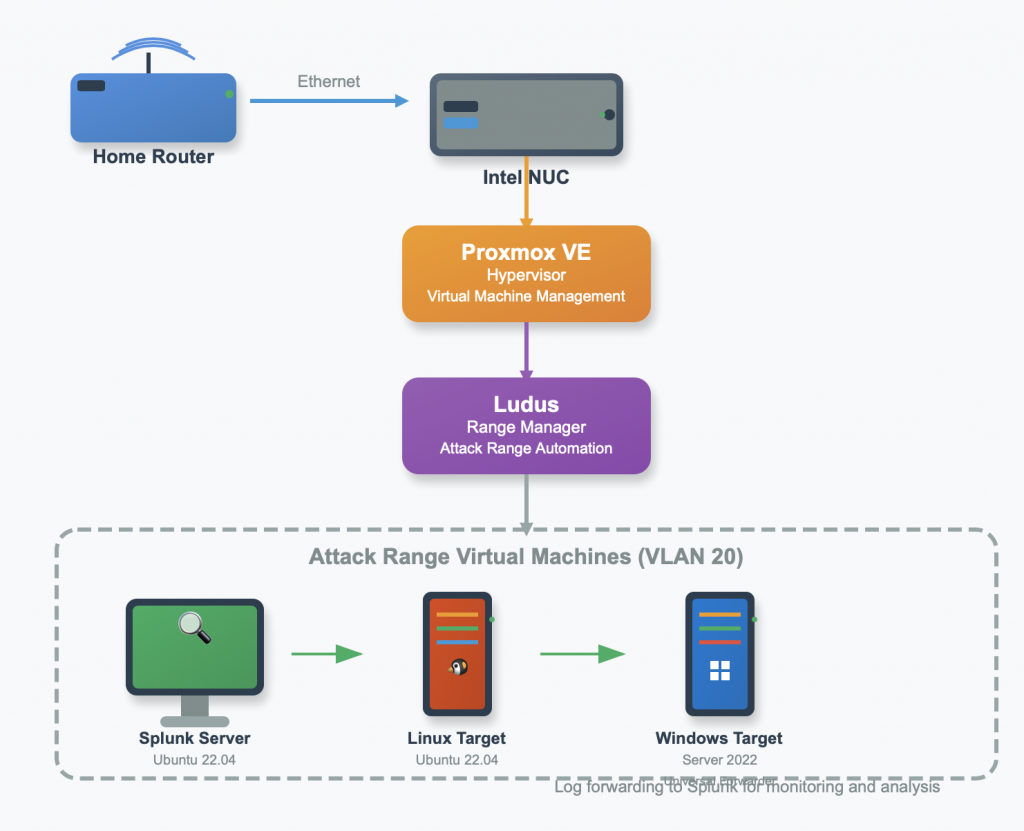
Why Choose Ludus + Proxmox Over Cloud Deployments?
Ludus makes it easy to build cyber environments for testing and development. Running on top of Proxmox, it offers powerful automation while still giving you the flexibility to manually tweak virtual machines and network setups. Most users install Ludus in a VM, but you can also install it directly on your Proxmox host. It works just as well either way.
The move away from cloud-based Attack Range deployments wasn’t just about cost. Okay, maybe that £50-a-day bill helped push me in the right direction. Here are the key advantages I discovered:
Cost Control: Once your hardware is set up, there are no ongoing cloud fees, making long-term testing and development much more affordable.
Performance Consistency: Dedicated hardware removes the unpredictability that comes with shared cloud resources, giving you stable and reliable performance.
Learning Opportunity: Running your own infrastructure gives you hands-on experience with virtualisation and helps build a deeper understanding of how everything fits together.
Plus, there’s something really satisfying about watching VMs spin up on hardware you can actually touch.
What You’ll Need
Before we dive into setting up Ludus on Proxmox, first make sure you have:
- A Proxmox environment
- Decent hardware specs (32GB+ RAM recommended, but can getaway with less)
- At least 200 GB of disk space (fast NVMe recommended)
- Basic familiarity with command line operations
- Root access to Proxmox
- Internet access (not via WiFi). Note: Bonded nics or other advanced networking configurations aren’t supported. If you use these, you will need to console in and fix the network after install (edit /etc/network/interfaces), as Ludus assumes you have a single, standard interface.
- A healthy sense of adventure
Step 1: Setting Up Ludus
First, let’s get Ludus installed and configured on Proxmox environment.
Install Ludus
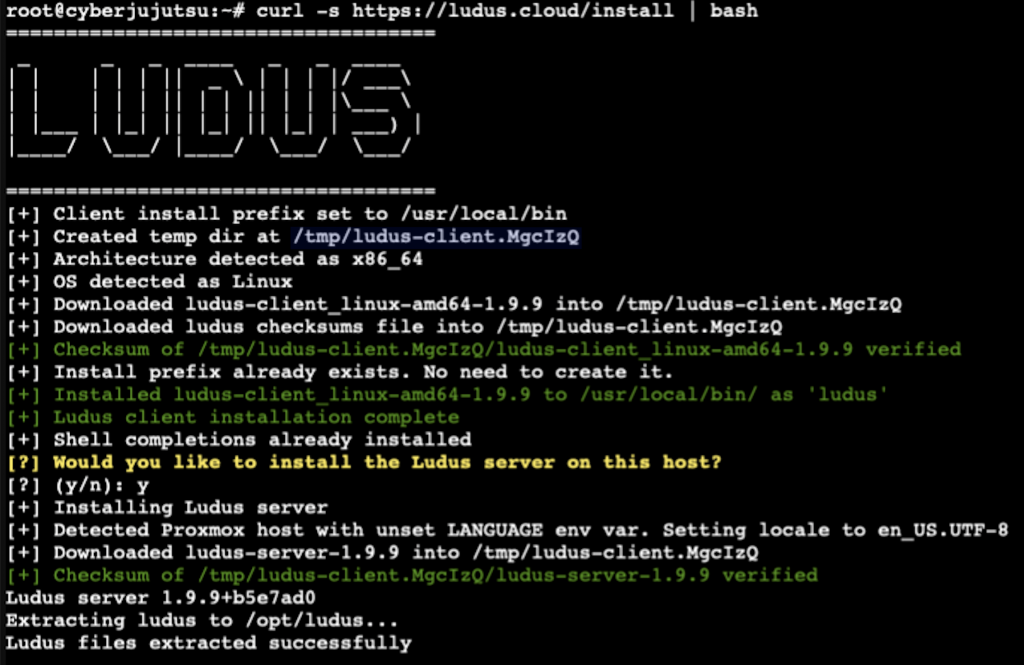
SSH into your Proxmox host and grab the Ludus installer:
curl -s https://ludus.cloud/install | bashThis script handles the heavy lifting of getting Ludus configured with your Proxmox environment and it’s surprisingly painless. The script installs the Ludus client and optionally includes shell completions. Then, it prompts you to install the server. Follow the interactive installer, and if you’re uncertain about any option, you can safely choose the default value.
Key Settings:
- proxmox_node: Your Proxmox node name (cyberjujutsu in my case)
- proxmox_interface: Network bridge interface (typically vmbr0)
- proxmox_local_ip: Internal IP address for management (192.168.1.10)
- proxmox_public_ip: External IP if applicable (192.168.1.10)
- proxmox_gateway: Network gateway (192.168.1.1)
- proxmox_netmask: Subnet mask (255.255.255.0)
- proxmox_vm_storage_pool: Storage pool for VMs (local-lvm)
- proxmox_vm_storage_format: This one tripped me up a bit. Ludus defaults to
qcow2, however, that didn’t play nice with my Proxmox setup. Consequently, I had to change it torawto get template deployment working properly. Make sure this matches the format your Proxmox storage supports - proxmox_iso_storage_pool: ISO storage location (local)
- ludus_nat_interface: NAT interface (vmbr1000)
Once you’ve gone through the server settings and before proceeding with actual installation, Ludus presents a detailed overview of what will be modified on your system.

Post-Installation Verification
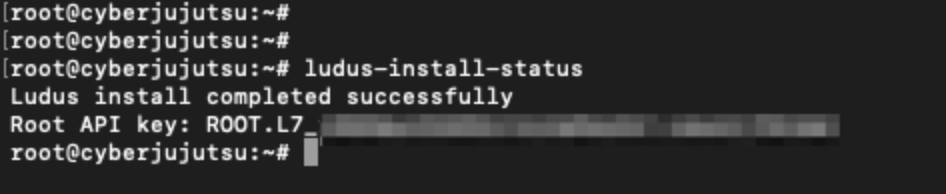
After the installation completes, you can verify the setup by checking the installation status:
The ludus-install-status command confirms that Ludus has successfully installed and provides the root API key for administrative access. Make note of the LUDUS_API_KEY as Ludus will not allow you to perform any actions without creating a standard Ludus user.
Next, it’s time to create your first Ludus user by running the following command:
ludus user add --name "name" --userid "userid" --admin --url https://127.0.0.1:8081Since you’ll include the –admin flag, this user will have administrative privileges. Therefore, make sure to include the LUDUS_API_KEY variable at the beginning of the command to ensure proper authentication.

Be sure to store this API key in a secure location, as it’s required for all Ludus-related operations. I chose to add it to my .bashrc file so it’s always available in my shell environment. Additionally, you can retrieve the password details for the newly created user using ludus user creds get

Step 2: Building Your VM Templates
Ludus operates on a template-based system, requiring pre-built VM templates for different operating systems. Consequently, I needed to ensure I had the necessary templates for a comprehensive Attack Range. You can achieve this with the templates command:
ludus templates list
The above capture shows the default list, however, if you want more templates, you can clone them from https://gitlab.com/badsectorlabs/ludus.
Since I required Ubuntu for building the Splunk Attack Range, I went down the route of cloning the repository and running the following command:
git clone https://gitlab.com/badsectorlabs/ludus
cd ludus/templates
ludus templates add -d <template name>
The disk size for each template appears in a packer file in directory /opt/ludus/packer for the templates in the default list. Meanwhile, the templates you download from the repo store their packer file in /opt/ludus/users/created_user/packer. You can edit this according to your preferences, depending on the amount of disk space available to you. I opted to edit this as I found that by default, each template receives about 200GB of disk space.
Once you have all your templates available and have updated the packer file if necessary, building the templates becomes as easy as running:
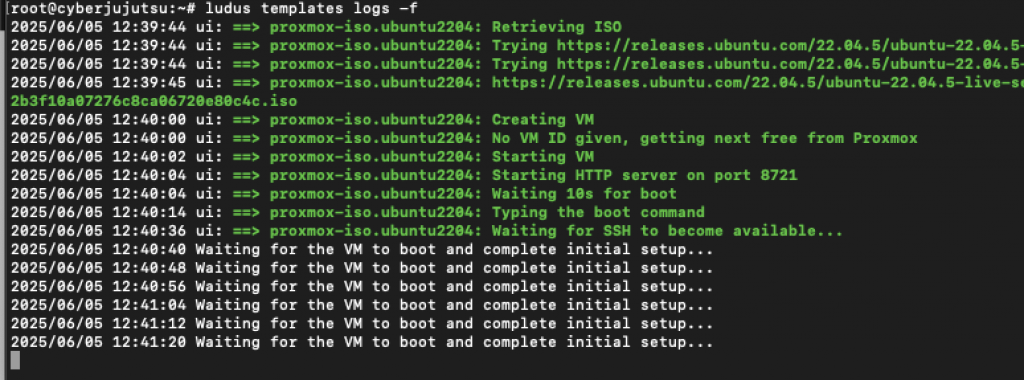
ludus templates build During template building, the system downloads base OS images, applies security hardening, installs necessary agents and tools, creates snapshots for quick deployment, and configures networking components. The process takes time, but you can clearly see the progress with detailed logging by running the ludus templates logs -f command.
This can also be seen via the Proxmox UI:

Step 3: Deploying Splunk Attack Range
Now that your Ludus environment is ready and you’ve built your templates, it’s time to deploy the actual Attack Range. Thanks to the excellent Ansible roles provided by the Ludus community, this process becomes significantly streamlined compared to manual Attack Range deployment.
Adding Required Ansible Roles
First, add the specialized Attack Range roles to your Ludus server:
ludus ansible roles add p4t12ick.ludus_ar_splunk
ludus ansible roles add p4t12ick.ludus_ar_windows
ludus ansible roles add p4t12ick.ludus_ar_linux
These roles handle all the heavy lifting of configuring Splunk, installing necessary forwarders, and setting up the Attack Range components automatically.
Creating the Attack Range Configuration
Now create your Attack Range configuration. Export your current config as a starting point and modify it:
ludus range config get > config.yml
Next edit the config.yml file to define your Attack Range environment:
ludus:
  - vm_name: "{{ range_id }}-ar-splunk"
    hostname: "{{ range_id }}-ar-splunk"
    template: ubuntu-22.04-x64-server-template
    vlan: 20
    ip_last_octet: 1
    ram_gb: 16
    cpus: 8
    linux: true
    roles:
      - p4t12ick.ludus_ar_splunk

  - vm_name: "{{ range_id }}-ar-windows"
    hostname: "{{ range_id }}-ar-windows"
    template: win2022-server-x64-template
    vlan: 20
    ip_last_octet: 3
    ram_gb: 8
    cpus: 4
    windows:
      sysprep: false
    roles:
      - p4t12ick.ludus_ar_windows
    role_vars:
      ludus_ar_windows_splunk_ip: "10.2.20.1"

  - vm_name: "{{ range_id }}-ar-linux"
    hostname: "{{ range_id }}-ar-linux"
    template: ubuntu-22.04-x64-server-template
    vlan: 20
    ip_last_octet: 2
    ram_gb: 8
    cpus: 4
    linux: true
    roles:
      - p4t12ick.ludus_ar_linux
    role_vars:
      ludus_ar_linux_splunk_ip: "10.2.20.1"
Important Configuration Note:
- You can adjust the ram_gb and cpus values for each VM based on the resources you have available. The current settings are a good starting point, but feel free to scale them up or down depending on your hardware.
- Ensure the ludus_ar_windows_splunk_ip and ludus_ar_linux_splunk_ip variables match your Splunk server’s IP
Deploying the Range
Apply your configuration and deploy:
ludus range config set -f config.yml
ludus range deploy
The deployment process will:
- First, create and configure all three VMs
- Then, install and configure Splunk Enterprise on the Ubuntu server
- Next, set up Windows logging and forwarding components
- Subsequently, configure Linux logging and Splunk Universal Forwarder
- Finally, apply necessary Attack Range configurations and data sources
Monitor the deployment progress:
"ludus range logs" or "ludus range logs -f"
Accessing Your Attack Range
Once deployment completes successfully, you can access all the VMs created via proxmox and Splunk can be accessed with below:
- Splunk Web Interface:
http://10.2.20.1:8000 - Default Credentials:
admin:changeme123!

Conclusion
Building a local purple team lab with Ludus and Proxmox has been one of the most rewarding projects I’ve taken on. It’s affordable, reliable, and gives you full control, which makes it perfect for learning.
The setup takes some patience, but once it’s in place, you’ve got a solid, high-quality lab at home. Now the real work begins: writing detection rules, testing attack techniques, and getting deeper into detection engineering, all without worrying about cloud costs.
Next, I’m focusing on building detection rules for new threats, trying out attack simulation tools, and improving coverage across the MITRE ATT&CK framework. Being able to test and reset things quickly makes this a great environment to learn and experiment.
Shifting from cloud to a home lab reminded me that sometimes the best way to grow is by building it yourself.